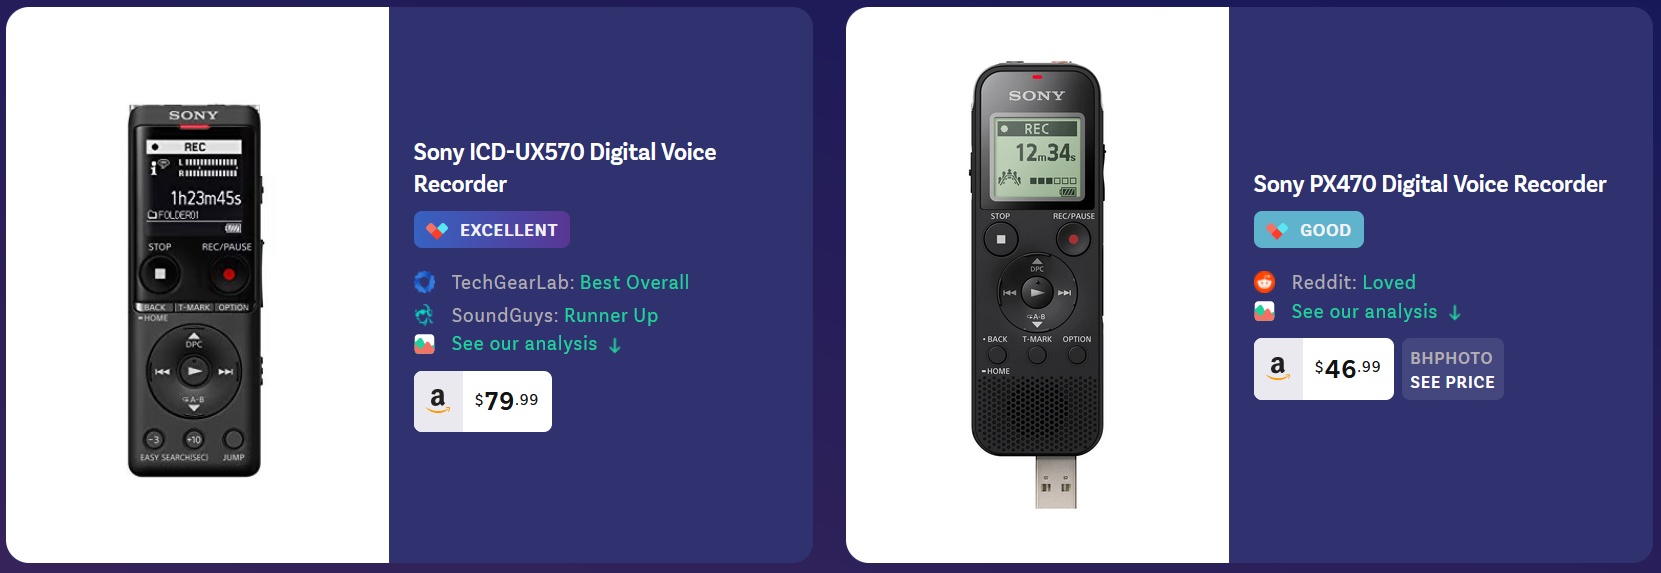
This post describes my usage experience with a Sony ICD-PX470 stereo digital audio (voice) recorder (DVR) (Amazon). A brief look at the manual for the more upscale ICD-UX570 (Amazon) suggested that many of these observations would apply to it as well.
Slant comparison of the two models (click to enlarge, Back button to return here)
Contents
Introduction
Specifications & Hardware
Collecting Audio Files for the DVR on a Desktop Computer
Downloading from Desktop Computer to DVR
Listening to and Manipulating Files
Introduction
First, a little more detail about the choice between those two models. Weloty and B&H Video said the more expensive UX570 was mostly similar to the PX470. It was distinguished chiefly by its smaller size, backlit screen, and built-in lithium battery (with shorter (!) battery life) vs. the PX470s’s two AAA batteries.
When choosing between the two models, battery preference would depend upon user needs: the UX570’s non-removable lithium would recharge in place via the USB connection, leaving the DVR immobile while charging, whereas the PX470’s removable AAAs would require a separate charger (if the user opted for the more affordable option of rechargeable AAAs) – but its AAAs could be swapped out, facilitating an immediate return to mobile service. Also, when the UX570’s lithium battery finally wore down, experience in replacing cellphone batteries suggested that it might be hard to find a quality replacement, whereas the user could replace the PX470’s AAA batteries endlessly.
I would have appreciated backlighting, but I didn’t need it badly enough to justify the price difference of $47 for the PX470 vs. $81 for the UX570. Suggestion to Sony (or its competitors) on that: incorporate something like the Timex Indiglo. That is, punch a button and get a few seconds of minimal light, requiring very little battery usage.
I started by putting two AAA batteries into the ICD-PX470 DVR. That woke it up: it wanted to run through basic setup. I used the arrow keys in the center front of the device to choose options and move on to the next questions. When that was done, I watched a one-minute video for a very barebones introduction to usage.
Next, I turned to the documentation. The device came with a printed manual. I preferred an electronic version. For that, I could download the PDF or use the web version of the original from Sony, or could choose a modified or enhanced copy from another source (e.g., the University of Colorado).
I found that the documentation was extensive, very helpful, but potentially bewildering, and still left many questions unanswered. In this post, I decided to take the approach of becoming familiar with the DVR by working through a few discrete issues.
Specifications & Hardware
Before getting too far into the manual, I took a few minutes to review the specs. I found a list of specifications through Sony’s webpage for this device.
Among other things, that page said the device could contain a maximum of 5,000 recordings, with up to 199 files per folder. The manual indicated that the DVR offered four different audio quality settings – from 48kbps MP3 mono (suitable for recording speech, placing the least demands upon battery and storage capacity) through 128kbps and 192kbps MP3 stereo to LPCM (a/k/a WAV) (44.1KHz, 16-bit stereo).
As an older listener without high-quality audio equipment, and with a song collection of mixed quality, I wasn’t sure that I had ever encountered an instance when 192kbps had been inadequate for my purposes. Meanwhile, as a long-time user of an Olympus VN-960PC DVR (released in 2006) who had been content with that device’s 4-bit 22.05kHz audio, I was confident that, for my purposes, this DVR’s lowest (48kbps) MP3 setting would be more than sufficient for recording speech.
Audio Mountain said that, for MP3 files, the disk usage calculation was straightforward. The 48kbps setting meant 48,000 bits per second = 6,000 bytes per second (i.e., eight bits in a byte) = 6KBps = 21,600KB/hour = 21.6MB/h. It didn’t matter if I was using a mono or stereo setting: the device would allocate a total of 48kb per second to capture the sound. Thus, at its lowest quality setting, the DVR would fill 1GB of storage space per 46 hours. Note: the manual specified a 1GB maximum size for each MP3 file. I hoped but doubted that it would automatically start a new file upon reaching that 1GB limit.
The specifications webpage said that, at that low 48kbps setting, the DVR could contain 159 hours of audio. That seemed to refer to the audio capacity of the official total of 4GB of internal storage. I say “official” total because, in practice, the actual capacity of formatted storage devices tended to be somewhat less than the alleged capacity. Presumably that explained why they didn’t say that the DVR’s total internal storage capacity was 4GB x 46 hours = 184 hours at the lowest (48kbps) setting.
The manual indicated that the DVR could accommodate microSDHC cards of 4GB to 32GB. It said that microSDXC cards were not supported. Apparently I would not be able to test that: according to Kingston, SDHC maxed out at 32GB; SDXC was available only in sizes larger than 32GB. No doubt Kingston was correct: my searches at Amazon and Newegg did not lead directly to any 64GB SDHC cards. When I tried a 64GB SDXC card, I drew an error, “This SD card not supported.”
I didn’t have a female-to-female USB adapter, so as to test whether the DVR’s USB connector could be used to access an external FAT32-formatted USB 2.0 drive. I was also unsure as to whether such a connection could damage the DVR. If that worked, there would still be the problem that the DVR might not recognize anything other than FAT32, with a probable but not certain 32GB limit (see e.g., Stack Overflow; MiniTool). Not that there seemed to be any real need to push the limits: a 32GB card would add eight times the amount of storage space just calculated. Combining internal and external storage, it appeared that, at the lowest quality (48kbps) setting, the DVR would record a maximum of 9 x 159 = 1,431 hours of audio. I did not test this.
The numbers were different at the DVR’s highest recording quality setting. Audio Mountain said that, for this DVR’s upper PCM (for present purposes, functionally equivalent to LPCM) limit, the value of 44.1kHz meant the device was taking 44,100 samples per second. For 16-bit audio, each sample used 16 bits per channel (i.e., 32 for stereo). So 44,100 x 32 = 1,411,200 bps / 8 = 176,400Bps (i.e., bytes) = 635MB/h. So in its stereo LPCM setting, the DVR would fill 1GB in about 94 minutes – again producing a theoretical total (~6:20, h:mm) exceeding what the specifications webpage offered in practice (5:20). But not to complain: again, the addition of a 32GB microSDHC card would apparently permit a total of nearly 50 hours of high-quality audio recording, though with the FAT32 limit of 4GB per file.
The manual advised making sure no operations were in progress before inserting a microSD card. To format the card, the manual told me, in effect, to go to the Reset/Format menu. This was my first hands-on experience with the DVR’s extensive menu options. To get to that menu, I hit the Back/Home button. This button seemed to behave in different ways at different times.
I hit the Back/Home button a couple times, until hitting it again achieved nothing. On this occasion, that gave me the option of repeatedly using the fast-forward right-arrow button to get to Settings > click the central button (i.e., the one showing a simple right arrow, officially the “play/enter” button) > arrow down to Common Settings > hit the “enter” button > arrow down to Reset/Format > enter > Format SD Card > enter > Delete all data (referring, I was sure, only to the data on the SD card). Finally, to verify the additional storage capacity, the manual directed me back to that same Common Settings menu > Available Rec. Time. It said I had over 41 hours of built-in memory time and 370 hours on the SD card at 192kbps MP3. Multiplying by 4 (to get the numbers for 48kbps) put both of those values within the ballpark of the estimates calculated above. So it appeared that my calculations roughly agreed with the device’s calculations.
In pratice, I wouldn’t achieve some of those numbers because the batteries would wear out first. The specifications webpage estimated that batteries (of the best quality, I assume) would run for 62 hours at 48kbps. The manual suggested using the DVR’s slide-out Type-A USB connector to obtain AC power “when you want to record for a long time.” I suspected I would find it awkward to plug the relatively bulky DVR directly into a USB port; fortunately, I had a USB extension cord.
The specifications webpage confirmed that the USB connection would not provide electrical current capable of charging the batteries in the DVR. When I plugged the USB connector into my desktop computer, partitioning tools (e.g., diskmgmt.msc, MiniTool Partition Wizard) recognized two drives: a 3.4GB (available capacity) FAT32 device named IC RECORDER, and a 29.8GB FAT32 MEMORY CARD drive.
Since both of those devices were FAT32-formatted, I assumed there would be no effective way to use compression to speed the copying process or to save drive space in a way that the DVR would recognize. While the manual specified that LPCM files would be limited to 4GB each, the simpler fact seemed to be that FAT32 would restrict any file to a maximum of 4GB.
I found that Windows File Explorer was able to explore folders on both of those devices. Nirsoft’s USBDeview, sorted by Device Type, found a Mass Storage device named SONY IC RECORDER USB Device occupying drives F and G and using USB 2.0 (a/k/a “Hi-Speed USB”). So my old USB extension cord would not be slowing file transfers. In Windows File Explorer, I had to right-click > Eject on each of those two drives separately to get messages saying that now I could safely disconnect the recorder from the desktop computer.
On this DVR, the standard 3.5mm mini phone microphone input and headphone output jacks were the only other hardware elements of practical importance. The manual provided instructions on settings when the input jack was used for “an external device other than a microphone.” An example would be audio output from a computer or radio. (I wasn’t sure whether, or at what volume levels, direct connections between DVR and computer could damage either such device.) The manual‘s reference to “a plug in power type microphone” was apparently intended to mean “5 volts of DC used to power up the JFET of inexpensive condenser microphones” (Shure, 2021). I didn’t test, but it appeared that the DVR was intended to accommodate a variety of microphone types.
Regarding the headset jack, the manual said I could connect headphones or active (i.e., self-powered) external speakers. Using this jack would temporarily disconnect the internal speaker. The drawing in the manual, and common sense, would suggest that the kind of “headphones” most likely to work, and least likely to drain the batteries, would be earbuds or a headset – not actual headphones (i.e., containing small speakers; see Headphones Lab, 2020). I suspected but did not test that a headset (i.e., with mini speakers in each ear) would wear down the DVR’s batteries much faster than earbuds.
For protection against loss or theft of the DVR itself, it seemed that I might want to engrave or put a sticker on it, to enable an honest finder to return it to me. For its audio contents, the DVR did not offer a lockscreen, encryption, or any other security. This might be unimportant if I was listening to materials that I wouldn’t mind sharing with the world, such as a copy of a lecture. But it could matter a great deal if I was working on a private issue or a major new product or idea. Losing the recorder, or just the SD card, could mean making that information available to the worst possible third party.

SD adapter and microSD card in clear plastic case
A security solution at the hardware level would be to remove the microSD card, carry it in a separate case, and perhaps use a PC to encrypt its key contents when not in use in the DVR. A different approach would be to limit myself to cryptic utterances selected to remind me of key issues without saying much to a finder. Or maybe I could put relevant prompts on a piece of paper that I could carry with me. A different approach would be to use a phone or tablet (which would usually have a lock screen option) instead of the DVR – though an intruder could remove a phone’s or tablet’s SD card and read its data, unless the device or an app encrypted its contents.
Collecting Audio Files for the DVR on a Desktop Computer
Searches of the manual turned up no references to Bluetooth, Wi-Fi, or other wireless capability. As far as I could tell, there was none. Therefore, it seemed that the DVR could communicate with a computer only via analog or USB methods.
Analog options would generally impair the quality of audio, and would be limited to real time (i.e., one second’s worth of audio per second of transmission). One analog option would be to play sound on the DVR’s speaker and capture it with a microphone (“mike”) connected to the computer, or vice versa with a speaker connected to the computer. Another would be to use one of the 3.5mm audio connectors discussed above, to transmit to the DVR while playing audio on the computer (via mike input) – or vice versa, while playing audio on the DVR (via headphone output). Presumably one could use streaming audio capture software (e.g., Free Sound Recorder) to record audio entering the computer from the DVR, presumably by connecting a cable from the DVR’s headphone out jack to the computer’s audio in jack (see above).
Those analog options would be useful only in unusual situations (e.g., using the DVR as the computer’s mike). In most cases, the microSD card and the DVR’s USB connector would provide the most efficient ways to move data files between the computer and the DVR. When using the USB connector, as mentioned above, I found that Windows File Explorer on my desktop computer was able to browse files and folders on the DVR, in both its built-in memory and on my added microSD card. Hence, it appeared that I should be able to use File Explorer to move files recorded on the DVR to a folder on the computer, where I could run standard audio editing software (e.g., Audacity, Cool Edit) to modify them, or could otherwise use or archive them as desired.
Note that, according to the manual, a desktop user could also treat the DVR as a USB storage device. That feature might seem unappealing, given the much smaller sizes and greater capacities of today’s USB flash drives. For what it was worth, I found that the computer would move files to and from a 64GB NTFS microSDXC card inserted in the DVR, and would open files of various types (e.g., PDF) stored on that card, even though the DVR’s own screen said, “This SD Card Not Supported.” Presumably this would work with a microSDXC card of any capacity. Nonetheless, to access the contents of a large microSD card, in most cases it would make more sense to use a simple microSD USB 3.0 adapter instead of being limited by this DVR’s slow USB 2.0 connection. (The more expensive ICD-UX570 still used USB 2.0 hardware.)
For ordinary purposes, I had long been accustomed to recording my own dictation and other audio, in the field, on my much older and simpler Olympus DVR. As noted above, the quality of its audio recordings, uploaded to Windows (as distinct from Linux), was inferior to even the minimum setting on this Sony DVR. It was quirky; it was only slightly smaller than the Sony; but I was used to it. However, I did have one particular need in mind: I wanted to download audio files from the computer, in order to carry and play them on the DVR, and the Olympus was able only to upload, not download. So now I turned to the question of how to use the Sony DVR to play and, perhaps, to mark or edit audio files originally created and/or stored on the desktop computer.
For this part of the exploration, I began by assembling the relevant files into a single folder on the desktop computer. If I did find the DVR useful to mark, split, or otherwise edit audio files, I would ideally use a folder comparison tool (I had the pro version of Beyond Compare) to detect the files that I had modified, so as to decide what to keep or overwrite when uploading from the DVR back to this source folder on the PC.
If I wanted to use the DVR for passive listening, there could be a question of how to get good audio content. Aside from music, according to GoodEReader (Dhaliwal, 2023),
Podcasts and audiobooks are the two most popular forms of audio entertainment. …
Podcasts are series of shorter episodes (30-60 mins) run by one or more guests. These can be quick news roundups, round-table discussions and more. Typically, podcasts have a regular schedule, and subscribers can access new episodes immediately.
On the other hand, audiobooks – as the term suggests – are written books read aloud. … [These] can take 7-8 hours or more, depending on the length of the content. Also, audiobooks can belong to any book genre ….
From a list of 20 podcast directories, various sources (e.g., Business Insider, BuzzSprout, Horn) identified a most-popular handful, including Apple, Spotify, Google, Amazon’s Audible, TuneIn, and Stitcher. Alternately, Patel said the easiest way to find podcasts was simply to Google for them (e.g., “business podcasts”). Altering that, my search for “most popular podcasts” led to Castos (2023; see also Chartable) lists of the several most popular podcasts in a variety of subject areas (e.g., The Langley Files: A CIA Podcast) and the 12 most popular podcasts (starting with The Joe Rogan Experience and The [New York Times] Daily, but also including various crime series).
Since the DVR didn’t have Internet access, I couldn’t play podcasts by streaming them from a website. I would need to download them and then play them from the DVR’s storage. I already had a free account at Spotify, so I started there. A search for the best Spotify podcasts suggested NPR’s Planet Money, which had also appeared on Castos’s list. To download it from its Spotify webpage on my desktop computer, PodCastle (2023) told me to start by installing the Spotify app. I ran the app, searched for Planet Money, and saw one recent episode listed. When I moused over the box describing that episode, other options emerged, including a download button. I clicked on that. PodCastle said the download would be in my library. I was able to change the location of the library by going into the Account icon (shaped like a person, at the upper right corner of the desktop app window) > Settings > Storage > Offline storage location. After designating my preferred location, I accepted the offer to restart the app. That created a bunch of funkily named folders at the designated location. TreeSize Free told me that a folder named simply “82” contained the largest file, about 32MB.
But now I found that these downloads were encrypted, so that they would play only in Spotify’s player. That wouldn’t work in the DVR. ViWizard (2021; see also Sidify) offered a tool that would supposedly perform “advanced DRM decrypting” to convert the download to common audio file formats. Alternately, WikiHow (Payne, 2023) suggested using iTunes for Windows, dBpoweramp (21-day full free trial; price unclear), or 123Apps’s Online Audio Converter. I tried the iTunes instructions; they didn’t seem to work. Pending further research and/or troubleshooting, another approach would be to use something like OBS Studio for real-time recording of playback in Spotify’s player (thus tying up one’s spare computer for however long the podcast played), and then convert the screen-captured result to MP3 or WAV using, say, Avidemux.
For present purposes, things were much simpler in the world of audiobooks. A search led to free streaming for “hundreds of free audiobooks, podcasts, and more” from Amazon’s Audible – which, again, would require an Internet connection – and also to a MakeUseOf article (Bates, 2020) recommending 20 free audiobooks. Among the ones that I hadn’t read (at least not within the past 40 years) and wanted to read, and that were available for actual download, I chose Eliot’s Waste Land, Wilde’s Picture of Dorian Gray, Coleridge’s Rime of the Ancient Mariner, and Conrad’s Heart of Darkness.
Downloading from Desktop Computer to DVR
On the desktop computer, I threw some other WAVs and MP3s into my DVR Audio folder and copied it to the DVR’s SD card via USB connection. I noticed that the DVR’s screen continued to say, “Connecting,” long after its internal and SD card partitions were connected and visible in Windows File Explorer. I could not get it to say anything else: evidently the DVR was constructed to render its own buttons inactive while it was connected to the computer. The “Connecting” indicator did not go away until I actually unplugged the DVR from the computer. After I disconnected, it took a few seconds before it was ready to get to work. Presumably it needed that time to sort out its records of my newly added or otherwise rearranged files.
The manual seemed to say that the DVR would detect folders on the SD card only if they were created under either the SD Card > PRIVATE > SONY > REC_FILE folder or the SD Card > MUSIC folder. I confirmed that: in Windows File Explorer, I put copies of a folder named WAVs under each of the MEMORY CARD, MUSIC, PRIVATE, and SONY folders. Then, on the DVR, I went to the Back/Home button. This time, hitting that button a couple of times (until hitting it again achieved nothing) gave me a choice between (among other things) Music or Recorded Files. Each of those two options had a Folders > SD Card option. Under Music, that option did display the newly added WAVs folder. But as the manual suggested, that was the only one of my newly created WAVs folder that I could access; the others were not in the specified accessible locations within the DVR’s file structure.
For the moment, I wasn’t inclined to divide the contents of the DVR Audio folder that I had created on the desktop computer’s drive D. So I didn’t put its music MP3 files into a subfolder under the DVR’s MUSIC folder. Instead, I copied the entire DVR Audio folder to the DVR’s REC_FILE folder. This was a slow process: it took 33:11 (mm:ss) for 4.2GB (i.e., 7.6GiB/hour, 2.2MiB/second). At first, I thought the slowness was due to the USB 2.0 connection. USB 2.0 was supposed to transfer data at a rate of 480Mbps (i.e., 60MBps) – but the typical write speed for a USB 2.0 device of this vintage (i.e., 2017) would reportedly be more like 15MB/sec.
Then I remembered that I was using the SD card. It was a Samsung 32GB EVO Class 10 microSDHC, purchased in 2015, advertised with a read speed of up to 48MB/s. To test it, I used Windows File Explorer to copy about 1.3GiB of data from one folder to another on the SD card, with the card inserted into the DVR. That took 14:14, for a rate of 5.6GiB/h or 1.6MiB/s. Painful! I was not sure whether the SD card was the only bottleneck, or whether the DVR’s circuitry contributed to the slowness. Especially when dealing with gigabytes of data, it might have been noticeably faster to take the SD card out of the DVR and connect it to the computer, using an adapter if necessary, to add or copy files on it. The DVR was virtually instantaneous, however, when I used it to move (as distinct from copying) files between folders on the SD card: it just needed to log the new location of those folders.
So now, at any rate, I had a copy of my DVR Audio folder stored in the REC_FILE folder, next to the DVR’s built-in FOLDER01 folder. I had found that the DVR would automatically recreate the FOLDER01 folder if I deleted it. But it didn’t do that if there was another folder, such as my DVR Audio folder, next to it in the PRIVATE > SONY > REC_FILE folder. Apparently the DVR just needed to have something there as a placeholder. In that case, within the menu displayed by the DVR’s own screen, the folder that I added under REC_FILE appeared at Recorded Files > Folders > SD Card.
Now it was time to sample the merchandise. I started with a set of several WAVs. Two came from my old Olympus DVR. Cool Edit variously characterized these as ACM Waveform, or IMA ADPCM, 22.050 kHz 4-bit mono. According to MediaInfo, they had an overall bitrate of 88.4 kbps. When I tried to play these, the Sony’s display said, “Unknown data.” The same thing happened with a 48 kHz PCM WAV file. I was also unable to get the Sony to play 32 kHz, 48 kHz, 96 kHz, or 192 kHz 16-bit mono or stereo PCM WAVs – or even 44.1 kHz mono. It appeared that the only WAV it could play was the PCM 44.1kHz, 16-bit stereo format that the DVR produced when recording a WAV file. To play these other WAVs, it seemed I would have to convert them to the 44.1kHz WAV format or else to MP3, perhaps using an audio editor (above) or Sony’s own Sound Organizer 2 (below) or something like VSDC Free Audio Converter.
The DVR was much more flexible on the MP3 side. I had created one MP3 using a 48kbps setting, like that which the DVR could record, and two others using settings of 64kbps and 96kbps, which the DVR could not record. It played all three without difficulty. In fact, it played stereo (and would presumably play mono) MP3s recorded at settings down to 20kbps (the lowest I tried) and possibly below that, all the way up to 320kbps. It played all of the podcasts and audiobooks that I had downloaded. B&H Photo indicated that the DVR was also capable of playing AAC and WMA formats, but I did not test those.
In short, for purposes of saving drive space and downloading time, and for maximizing playback capability, it seemed better to use MP3s than WAVs, converting the latter as needed.
Listening to and Manipulating Files
I was interested in downloading files from the computer to the DVR (above) because I saw the DVR as a compact, relatively inexpensive device, with very long battery life, that I might be able to use for processing certain audio materials. As noted above, these materials were of two kinds. One kind was for purely passive listening. For instance, I might listen to a song or a podcast. The other kind could call for more active engagement with the material. For example, I might want to flag or extract a part of a lecture to revisit later. This section focuses on active rather than passive usage.
Perhaps the simplest form of active engagement was to delete a file. For this, the manual was clear: while looking at the list of files in a folder, press the OPTION button and select Delete a File. Other useful choices at that same place: Protect, Move, or Copy the file; Delete all files; or display File Information. That last option displayed file length, codec (e.g., MP3), bitrate (e.g., 64 kbps), sample rate (e.g., 22.05 kHz), bit depth (e.g., 16-bit), location (e.g., SD Card), and path (i.e., subfolder location). Other simple operations were available by hitting the Back/Home button repeatedly, arrowing to the right, and then selecting Settings. Within that menu, the Recording Settings choice included the option to create a folder.
Otherwise, the DVR’s primary options for manipulating files included marking and dividing. The manual indicated that I could add a track mark (up to 98 marks per file) by simply hitting the T-MARK button, regardless of whether recording or playback was underway or paused. This would cause the track mark indicator (a flag icon) to flash three times. It sounded like this would work even if, at the moment, I was browing another part of the DVR’s menu. To return to a track mark, I could press the fast-forward or fast-rewind arrow buttons (to the right or left of the central arrow button) and then press the Play button as needed. The manual said that I could add track marks at predetermined intervals (i.e., 5, 10, 15, or 30 minutes) by using Settings > Recording Settings > Auto Track Marks. To delete a track mark, the manual instructed me to play the file, stop at a point after the track mark I wanted to delete, and then hit the OPTION button > arrow down to Delete Track Marks > enter > choose This Track Mark or All Track Marks.
To divide a file, the manual told me, first, to find my desired dividing point. I could do that by using the Play, Rewind, and/or Fast Forward buttons as needed, or by getting back to a track mark as just described. Then I would hit the OPTION button > Divide. That gave me a choice of dividing the file at Current Position or, instead, at All Track Marks. In an example where I inserted two track marks into a file, the latter option divided the source file into three output files.
The preceding paragraphs seemed to summarize the primary functions, for purposes of actively listening to files within the DVR. The remaining question was whether Sony’s Sound Organizer 2 software, running on the desktop computer, would contribute any other meaningful functions. The webpage specific to the current version (2.0.03) listed its capabilities. These included general-purpose audio editing functions – probably not on a par with those of Audacity or other audio editors, but possibly simpler or otherwise more practical for the average user.
Sound Organizer 2 did seem to offer a few capabilities, also available on the DVR, that might be easier to deal with on the desktop. These included conversion between MP3 and WAV, along with playback modes also offered in the DVR (i.e., Digital Pitch Control, Noise Cut, A-B Repeat, and Transcription). These functional similarities suggested that maybe Sony’s software people designed the Windows software as a dry run for what the DVR would be able to do. Or maybe it was the other way around: maybe they decided to offer the software after working through the process of enabling such features on the DVR. For those who had not yet bought the DVR, presumably the free software would provide some sense of what the device would be able to do in the field. At this writing, I hoped but had not yet tested whether Sound Organizer 2 would contribute anything to the marking and splitting of audio files.
